Nostale Different Specialist guide
Feel Bored Nothing To do so I compile all the specialist guide
into One whole thread =P
Content:
Click here For The Guide
-->Lvl 27 Specialist Guide (Pajama Card Guide)
-->Lvl 36 Specialist Guide
-->Lvl 46 Specialist Guide
-->Lvl 45 Specialist Guide (Jajamaru Quest Guide)
-->Lvl 56 Specialist Guide
Friday, March 21, 2008
>Level 27 Specialist Guide (Pajama Card Guide)
>Level 27 Specialist Guide (Pajama Card Guide)
Original Thread:
Credits to Blazed from Nostale UK Forum
Original Thread: http://board.nostale.co.uk/thread.php?threadid=3375
Contents
1. Intro to Pajama SP Cards
2. About SP Cards
3. SP Points
4. Walkthrough of the Pajama Quest
5. Skills of the Pajama Class
Versions
Version 0.1- Made this guide
Version 0.2- Added FAQ article
Version 0.3- Revised and edited this guide
Version 0.4- Edited this guide
Version 0.5- Edited this guide, posted it on Nostale Forums
Version 0.6- Edited this guide completely
Version 0.7- Added that mini games can give you Wood too
Since no one made a pajama guide, and since I was bored, and Noshaven is down, I made a pajama guide, do not ask why I put version 1, 2, 3, etc, I’m not a good speller, probably many type os, simple. This guide is long, don’t read it if you don’t have time. This is also my first attempt on making a guide; it will probably be not that good of a guide.
Intro to Pajama SP Cards
Pajama SP Card is a type of SP Class (SP Cards are explained below) that is different from most SP Classes. Unlike any other class, this class has all emotion skills expect for your basic attack: Pillow Hitting. The only class that is similar to the Pajama Class is a Chicken Class.
About SP Cards
SP (Specialist) cards are special items that transfer you to a whole different job. You can get SP cards from Chicken Raiding, Quests, and trades from other people. (You will need a Card Carrier before trading.) When you transform, your skills and job level will be different for as long as you remain in your SP card. To transform, equip your SP card and press the S button again to transform. To transform back, press the S button again. Once a SP Card reaches level 20 job, your exp from SP Cards will go to your normal job level.
SP Points
SP points are points used for SP Classes. When equipped with a SP Card, you will notice that next to the S sign there’s 2 bars. (One in yellow the other in Purple) The yellow bar is your basic SP. When ever you attack a monster while in SP Card mode, for every 1 second 3 Basic SP points are used. This does not count for Pajama and Chicken Classes so don’t ask me why im making this paragraph. On 12:00 midnight GST, you will receive 10,000 SP points in your Basic SP Bar. So you ask what happens to the rest of your unused SP? Only 10% of your leftover SP is transferred to the Purple bar below the yellow bar. Your purple bar is called Extra SP Points. So use your everyday SP Wisely!!
Walkthrough on the Pajama Quest
So you’re probably wondering how to get the Pajama SP Card? Well, you will have to be level 27+ to do the quest, and you will have to follow the requirements below to equip the Pajama SP Card
1. Reputation have to be Trainee (501-1000) or higher
2. Job level have to be 10+
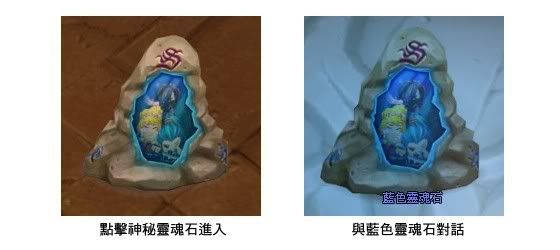
Now, how to start? Note: it’s a very long boring quest, but the rewards are worth it. Start the quest by clicking on the purple diamond in Sunny Meadows. Locate the purple diamond on your mini map. After you get closer to the diamond, it should be labeled Gem of Mystery. Double click the gem to be teleported to another mini map. Inside that mini map, click on a big stone labeled Yellow Gem of Mystery. Then you start the quest, don’t forget to be level 27+. Now I’m going to list the steps of the Pajama Card Quest:
1. Bring Pajama Fairy 50 wool for a blanket, wool can be found by killing wooleys, sheep’s, and rammers. If your lazy, buy them
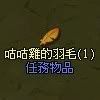
2. Bring Pajama Fairy 50 chicken feathers for a pillow, chicken feathers are not droppable, tradable, etc. Only the person doing the quest can obtain chicken feathers. Chicken feathers are dropped by super chickens located in the right portal of the Gem of Mystery
3. Bring Pajama Fairy 40 low quality trees for a bed frame, best way is to get it as a bonus prize form the level 12 Time Space Stone. If your lazy, buy them. Another way is to play mini games and get rewards from them
4. Almost there! Bring Pajama Fairy 30 jelly for a mattress, obtain jellys by killing Baby Red Jellys found in the same mini map as Super Chickens. Jellys are not droppable, tradable, etc. Again, only the person doing the quest can get it, can’t ask higher levels to get it for you.
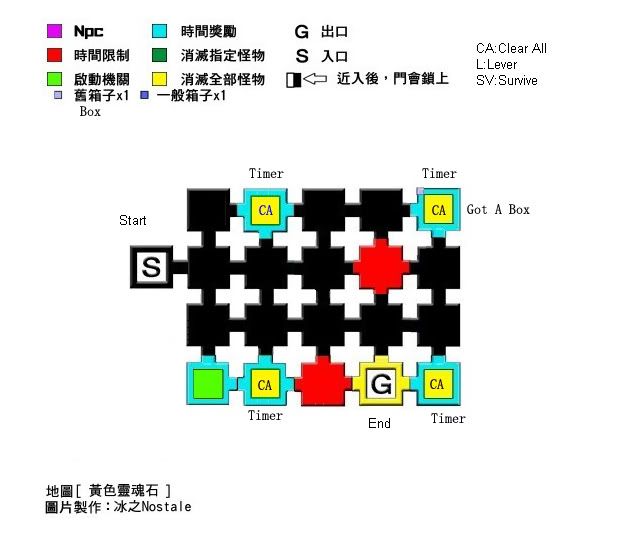
5. This is the easy part, Pajama Fairy will teleport you to a Time Space Stone, but don’t worry, its not hard. All you have to do is go down until you reached an end, then go left.
6. Reward: Pajama SP Card! Now its time to go train your job. ^^
Picture of the Golden Feather:
Picture of the Blue Cube:

Lvl 27 TS Map (Maybe Not Accurate):
More Information Are At Here :
http://nostale.cc-infos.com/index-8-27-1.htm
Original Thread:
Credits to Blazed from Nostale UK Forum
Original Thread: http://board.nostale.co.uk/thread.php?threadid=3375
Contents
1. Intro to Pajama SP Cards
2. About SP Cards
3. SP Points
4. Walkthrough of the Pajama Quest
5. Skills of the Pajama Class
Versions
Version 0.1- Made this guide
Version 0.2- Added FAQ article
Version 0.3- Revised and edited this guide
Version 0.4- Edited this guide
Version 0.5- Edited this guide, posted it on Nostale Forums
Version 0.6- Edited this guide completely
Version 0.7- Added that mini games can give you Wood too
Since no one made a pajama guide, and since I was bored, and Noshaven is down, I made a pajama guide, do not ask why I put version 1, 2, 3, etc, I’m not a good speller, probably many type os, simple. This guide is long, don’t read it if you don’t have time. This is also my first attempt on making a guide; it will probably be not that good of a guide.
Intro to Pajama SP Cards
Pajama SP Card is a type of SP Class (SP Cards are explained below) that is different from most SP Classes. Unlike any other class, this class has all emotion skills expect for your basic attack: Pillow Hitting. The only class that is similar to the Pajama Class is a Chicken Class.
About SP Cards
SP (Specialist) cards are special items that transfer you to a whole different job. You can get SP cards from Chicken Raiding, Quests, and trades from other people. (You will need a Card Carrier before trading.) When you transform, your skills and job level will be different for as long as you remain in your SP card. To transform, equip your SP card and press the S button again to transform. To transform back, press the S button again. Once a SP Card reaches level 20 job, your exp from SP Cards will go to your normal job level.
SP Points
SP points are points used for SP Classes. When equipped with a SP Card, you will notice that next to the S sign there’s 2 bars. (One in yellow the other in Purple) The yellow bar is your basic SP. When ever you attack a monster while in SP Card mode, for every 1 second 3 Basic SP points are used. This does not count for Pajama and Chicken Classes so don’t ask me why im making this paragraph. On 12:00 midnight GST, you will receive 10,000 SP points in your Basic SP Bar. So you ask what happens to the rest of your unused SP? Only 10% of your leftover SP is transferred to the Purple bar below the yellow bar. Your purple bar is called Extra SP Points. So use your everyday SP Wisely!!
Walkthrough on the Pajama Quest
So you’re probably wondering how to get the Pajama SP Card? Well, you will have to be level 27+ to do the quest, and you will have to follow the requirements below to equip the Pajama SP Card
1. Reputation have to be Trainee (501-1000) or higher
2. Job level have to be 10+
Now, how to start? Note: it’s a very long boring quest, but the rewards are worth it. Start the quest by clicking on the purple diamond in Sunny Meadows. Locate the purple diamond on your mini map. After you get closer to the diamond, it should be labeled Gem of Mystery. Double click the gem to be teleported to another mini map. Inside that mini map, click on a big stone labeled Yellow Gem of Mystery. Then you start the quest, don’t forget to be level 27+. Now I’m going to list the steps of the Pajama Card Quest:
1. Bring Pajama Fairy 50 wool for a blanket, wool can be found by killing wooleys, sheep’s, and rammers. If your lazy, buy them
2. Bring Pajama Fairy 50 chicken feathers for a pillow, chicken feathers are not droppable, tradable, etc. Only the person doing the quest can obtain chicken feathers. Chicken feathers are dropped by super chickens located in the right portal of the Gem of Mystery
3. Bring Pajama Fairy 40 low quality trees for a bed frame, best way is to get it as a bonus prize form the level 12 Time Space Stone. If your lazy, buy them. Another way is to play mini games and get rewards from them
4. Almost there! Bring Pajama Fairy 30 jelly for a mattress, obtain jellys by killing Baby Red Jellys found in the same mini map as Super Chickens. Jellys are not droppable, tradable, etc. Again, only the person doing the quest can get it, can’t ask higher levels to get it for you.
5. This is the easy part, Pajama Fairy will teleport you to a Time Space Stone, but don’t worry, its not hard. All you have to do is go down until you reached an end, then go left.
6. Reward: Pajama SP Card! Now its time to go train your job. ^^
Picture of the Golden Feather:
Picture of the Blue Cube:
Lvl 27 TS Map (Maybe Not Accurate):
More Information Are At Here :
http://nostale.cc-infos.com/index-8-27-1.htm
>Level 36 Specialist Guide
>Level 36 Specialist Guide
Credits to Waffles from Nostale UK Forum
Original Thread: http://board.nostale.co.uk/thread.php?threadid=957
Alot of people have been asking about how to do the lvl 36 specialist TSes, and ingame, I've had quite a few people ask me to do some parts for them. After going through these TSes several times (and I've done them as archer, mage, and swordie), I've decided to write a guide out of request. Hopefully it will help you guys who are struggling ^^
NOTE: I think it's best if you at least try to do the TSes on your own for the first few times before reading the guide. It's a learning experience afterall xD
The Lvl 36 SP card TS is located in the top left corner of Entry to Fernon Temple as shown in the map below.

There are basically 3 main things you must remember about these TSes:
1) Do only what is needed or asked of you! There are only a few rooms in these TSes that you are required to enter in order to do something (pull a lever or kill a certain enemy). You do not and should not go to any other rooms as they will only waste time. If you are asked to kill 1 enemy in a room of multiple monsters, go after that one enemy alone. Ignore all other monsters unless you absolutely MUST kill them.
2) Keep your nosmates alive! Why? Because nosmates serve as tanks and distractions. There will be rooms where you must pull a lever, and they will be full of monsters. In order to be quick enough to pull a lever, you often need to use your nosmates as distractions. This can be done by A) running around the room, gathering all the monsters until they are all chasing after you and your nosmates, then press "S" or "A" and let them stand there tanking while you quickly run over and pull the lever OR B) "Press A and click to a destination. They'll run in, aggravate the majority of the monsters and the lever is your for the pulling. When you pull the lever, they'll automatically revert to "D" setting." (Contributed by and quoted from Verin100)
"If youre using tom as the tank... make sure that he is wearing nice armor.... lvl 35 armor for swordies are nice... just convert them at teoman topp so that your tom can wear it" (Contributed by and quoted from sereko07)
3) Have pots! Potions are not actually important for you, especially not if you're a mage or swordie. They are MANDATORY for your nosmates. You must keep them alive, remember? xP And yes, they are for you too, but sometimes, snacks will do the trick too, and if you're a mage, you have heal anyway xP
I will post maps of the TSes below. The RED LINE shows the path you should go. If you follow the path of the red line, it will point you to the rooms that you must go in order to unlock another door. Also, the order that you must go to these required rooms (which are BLUE) is indicated by a little number in the rooms. The number tells you the order that you should do them in. The rooms with astericks (*) have notes that I will talk about below the maps.
TS 1
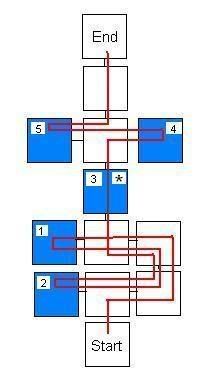
The red line may be confusing but what it basically means is you must go to room 1 first because room 2 is locked, then back down to room 2, then go back up to room 3, etc.
Room 1: Kill the Boing that is glowing. Kill ONLY the glowing Boing. Don't bother with anything else.
Room 2: Kill everything.
Room 3: Kill all the monsters or wait until timer runs out.
* In this room, you do not have to kill all the monsters within the time limit. You can just wait it out if you want to save up on food and pots. However, if you kill all the monsters before time runs out, you can move to the next room quicker. I highly recommend that you kill all the mobs as quickly as you can!
Room 4: Kill the glowing Chesty. Kill ONLY the glowing chesty.
Room 5: Pull the lever. Use your nosmates as tanking bait if you need to.
(Rooms 4 and 5 can be done in any order)
In the last room, just kill the glowing imp. Ignore everything else. Use your nosmates as tanks if you must.
TS 2

You need potions for this one. All of the blue rooms require you to pull levers, and there are a lot of monsters in the rooms. So you must keep your nosmates alive and have them serve as distractions until you finish the 4th room.
In the last room, just kill the glowing imp like before.
TS 3

This is really straightforward. Just follow the red path. There are a few rooms that require you to kill all the monsters, but there are only 3 or 4 in there, so it's easy. One of the rooms require you to pull a lever, and you should have gotten lots of practice from the 2nd TS by then xP
Room 1: Kill all the monster or wait out the timer.
*) In this room, you do not have to kill all the monsters within time limit to be able to move to another room, but you DO have to kill all the monsters within time limit to be able to move to the UPPER room. I strongly advise you to try to kill all the monsters in this room, because if you don't, you must go to the room left of that one, and it'll take you a longer time because the left path offers more monsters for you to kill. If you go UP, you'll waste less time. I highly recommend that you kill all the mobs as quickly as you can!
Room 2: Pull the lever.
Room 3: Kill all monsters.
Room 4: Kill all monsters.
In the last room, you must kill the boss. Just fire everything you got at him. I highly recommend keeping your nosmates alive to tank especially if you're a mage or archer. Use pots!! Lots of pots >_< and spam like mad if you need to. Remember you get an extra 10 minutes when you reach the boss room, so you'll have plenty of time to run around and get your hp up if you need to, but I personally prefer to kill off that guy as quickly as I can lol.
Advice from Nishin: You should get pet protection dolls. If your pet dies during distracting mosters, it automaticly will be resurrected and that saves seeds and even maybe you. And the last part, don't take your champagne out too soon. Stay calm and watch your hp.
Thanks to LordAshram for sending me this picture which gives the stats for the Dust King.

Once again thanks to Waffles
For More information on Level 36 Specialist Source found by me =P
http://nostale.cc-infos.com/index-8-36-1.htm
Sorry but The Website is in Chinese but it got some Cool Guide
On Time sphere and others stuff basically is a Database for Nostale
Credits to Waffles from Nostale UK Forum
Original Thread: http://board.nostale.co.uk/thread.php?threadid=957
Alot of people have been asking about how to do the lvl 36 specialist TSes, and ingame, I've had quite a few people ask me to do some parts for them. After going through these TSes several times (and I've done them as archer, mage, and swordie), I've decided to write a guide out of request. Hopefully it will help you guys who are struggling ^^
NOTE: I think it's best if you at least try to do the TSes on your own for the first few times before reading the guide. It's a learning experience afterall xD
The Lvl 36 SP card TS is located in the top left corner of Entry to Fernon Temple as shown in the map below.
There are basically 3 main things you must remember about these TSes:
1) Do only what is needed or asked of you! There are only a few rooms in these TSes that you are required to enter in order to do something (pull a lever or kill a certain enemy). You do not and should not go to any other rooms as they will only waste time. If you are asked to kill 1 enemy in a room of multiple monsters, go after that one enemy alone. Ignore all other monsters unless you absolutely MUST kill them.
2) Keep your nosmates alive! Why? Because nosmates serve as tanks and distractions. There will be rooms where you must pull a lever, and they will be full of monsters. In order to be quick enough to pull a lever, you often need to use your nosmates as distractions. This can be done by A) running around the room, gathering all the monsters until they are all chasing after you and your nosmates, then press "S" or "A" and let them stand there tanking while you quickly run over and pull the lever OR B) "Press A and click to a destination. They'll run in, aggravate the majority of the monsters and the lever is your for the pulling. When you pull the lever, they'll automatically revert to "D" setting." (Contributed by and quoted from Verin100)
"If youre using tom as the tank... make sure that he is wearing nice armor.... lvl 35 armor for swordies are nice... just convert them at teoman topp so that your tom can wear it" (Contributed by and quoted from sereko07)
3) Have pots! Potions are not actually important for you, especially not if you're a mage or swordie. They are MANDATORY for your nosmates. You must keep them alive, remember? xP And yes, they are for you too, but sometimes, snacks will do the trick too, and if you're a mage, you have heal anyway xP
I will post maps of the TSes below. The RED LINE shows the path you should go. If you follow the path of the red line, it will point you to the rooms that you must go in order to unlock another door. Also, the order that you must go to these required rooms (which are BLUE) is indicated by a little number in the rooms. The number tells you the order that you should do them in. The rooms with astericks (*) have notes that I will talk about below the maps.
TS 1
The red line may be confusing but what it basically means is you must go to room 1 first because room 2 is locked, then back down to room 2, then go back up to room 3, etc.
Room 1: Kill the Boing that is glowing. Kill ONLY the glowing Boing. Don't bother with anything else.
Room 2: Kill everything.
Room 3: Kill all the monsters or wait until timer runs out.
* In this room, you do not have to kill all the monsters within the time limit. You can just wait it out if you want to save up on food and pots. However, if you kill all the monsters before time runs out, you can move to the next room quicker. I highly recommend that you kill all the mobs as quickly as you can!
Room 4: Kill the glowing Chesty. Kill ONLY the glowing chesty.
Room 5: Pull the lever. Use your nosmates as tanking bait if you need to.
(Rooms 4 and 5 can be done in any order)
In the last room, just kill the glowing imp. Ignore everything else. Use your nosmates as tanks if you must.
TS 2
You need potions for this one. All of the blue rooms require you to pull levers, and there are a lot of monsters in the rooms. So you must keep your nosmates alive and have them serve as distractions until you finish the 4th room.
In the last room, just kill the glowing imp like before.
TS 3
This is really straightforward. Just follow the red path. There are a few rooms that require you to kill all the monsters, but there are only 3 or 4 in there, so it's easy. One of the rooms require you to pull a lever, and you should have gotten lots of practice from the 2nd TS by then xP
Room 1: Kill all the monster or wait out the timer.
*) In this room, you do not have to kill all the monsters within time limit to be able to move to another room, but you DO have to kill all the monsters within time limit to be able to move to the UPPER room. I strongly advise you to try to kill all the monsters in this room, because if you don't, you must go to the room left of that one, and it'll take you a longer time because the left path offers more monsters for you to kill. If you go UP, you'll waste less time. I highly recommend that you kill all the mobs as quickly as you can!
Room 2: Pull the lever.
Room 3: Kill all monsters.
Room 4: Kill all monsters.
In the last room, you must kill the boss. Just fire everything you got at him. I highly recommend keeping your nosmates alive to tank especially if you're a mage or archer. Use pots!! Lots of pots >_< and spam like mad if you need to. Remember you get an extra 10 minutes when you reach the boss room, so you'll have plenty of time to run around and get your hp up if you need to, but I personally prefer to kill off that guy as quickly as I can lol.
Advice from Nishin: You should get pet protection dolls. If your pet dies during distracting mosters, it automaticly will be resurrected and that saves seeds and even maybe you. And the last part, don't take your champagne out too soon. Stay calm and watch your hp.
Thanks to LordAshram for sending me this picture which gives the stats for the Dust King.
Once again thanks to Waffles
For More information on Level 36 Specialist Source found by me =P
http://nostale.cc-infos.com/index-8-36-1.htm
Sorry but The Website is in Chinese but it got some Cool Guide
On Time sphere and others stuff basically is a Database for Nostale
>Level 46 Specialist Guide
>Level 46 Specialist Guide
Sorry again because the guide for level 46 Specialist from Nostale (UK) forum
Isn’t clear enough so I going to made a New Guide With more picture For Level 46
Specialist guide But still Credits to (moja) For The Level 46 Specialist Guide
Orinigal Thread : http://board.nostale.co.uk/thread.php?threadid=1023
Look For this Time Stone :
The palace where it is :

Flow:
1) Collect 100 Lily of Purity
To collect these, you have to fight monsters that are of similar levels as you (+/- 5). Depending on your level, you can farm for them at either B1/B2 of the temple or comet meadow. If you are also doing Jajamaru quest, you can try to farm inside it, as the drop rate seems to be very higher (>50%). Once done, talk to the gem for the 1st Ts.
Picture of The Lily Of Purity:

2) 1st Ts
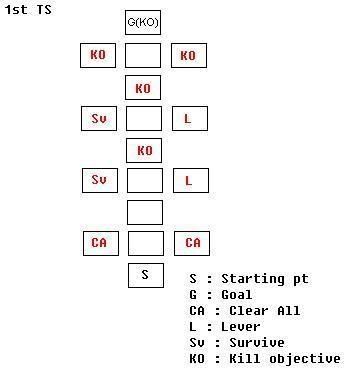
Time Sphere with color and different Monster from Different Room:
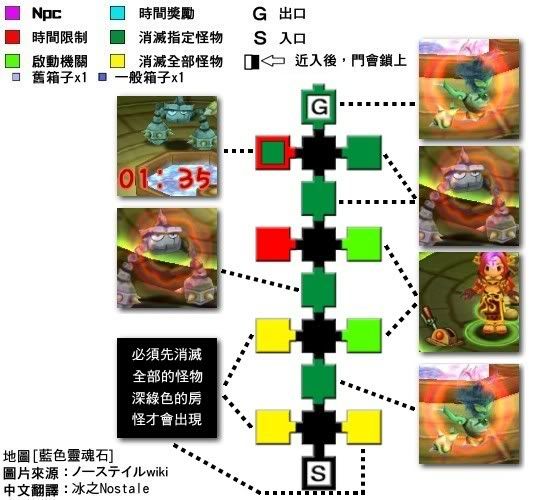
For this TS, there is sufficient time to rest (ie eat food/snacks). Hence, i would suggest that you explore all the rooms. For the final room, you will need to kill the objective in order to open the exit.
c) 2nd Ts
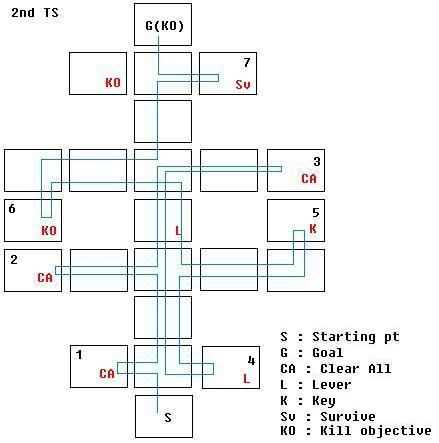
Time Sphere with color and different Monster from Different Room:
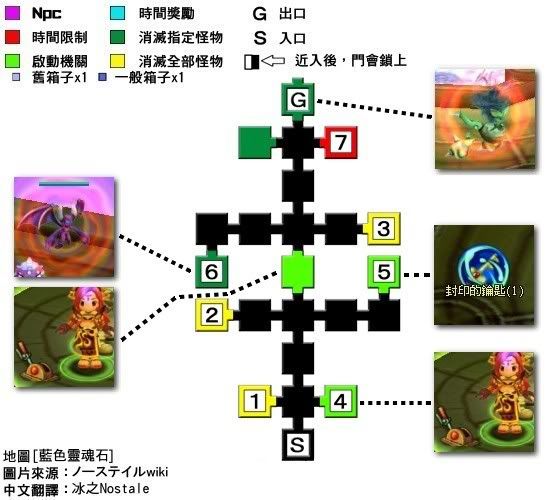
This TS is more tricky than the other two as only certain levers/keys will unlock their respective doors. Basically, you will be exploring rooms on the left before reaching the 3rd 4-way junction. Upon reaching it, you will go right then make a detour back to the 1st 4-way junction. Following that, you will explore rooms on the right of the 1st junction before continuing on to the right of the 2nd junction. After that, you will proceed on to the left of the 3rd junction. Once done, you will go on to the 4th junction where you turn right and get yourself FULLY healed before entering as there are WarePards (leopard lookalike) inside. For the final room, you need to kill the objective in order to open the exit.
edit: Added the sequence of rooms to be explored. 1->7
d) 3rd Ts

Time Sphere with color and different Monster from Different Room:

For this Ts, make sure that you kill only the objective, so that there will be sufficient time to rest. All the rooms need to be explored, but in some of the rooms (labelled 'KO'), killing a specific target will unlock the room. As for the final room, you will fight a lv63 demon. Be prepared to use some potions. It is STRONGLY recommended that you change to a specialist (warrior/red mage/ranger) BEFORE the final room
Once done, you will get your specialist card.
For More information Please Check Out The Same Website:
http://nostale.cc-infos.com/index-8-46-1.htm
Sorry for the no experience in Level 46 Specialist because I haven reach that
Level yet =X
Sorry again because the guide for level 46 Specialist from Nostale (UK) forum
Isn’t clear enough so I going to made a New Guide With more picture For Level 46
Specialist guide But still Credits to (moja) For The Level 46 Specialist Guide
Orinigal Thread : http://board.nostale.co.uk/thread.php?threadid=1023
Look For this Time Stone :
The palace where it is :
Flow:
1) Collect 100 Lily of Purity
To collect these, you have to fight monsters that are of similar levels as you (+/- 5). Depending on your level, you can farm for them at either B1/B2 of the temple or comet meadow. If you are also doing Jajamaru quest, you can try to farm inside it, as the drop rate seems to be very higher (>50%). Once done, talk to the gem for the 1st Ts.
Picture of The Lily Of Purity:
2) 1st Ts
Time Sphere with color and different Monster from Different Room:
For this TS, there is sufficient time to rest (ie eat food/snacks). Hence, i would suggest that you explore all the rooms. For the final room, you will need to kill the objective in order to open the exit.
c) 2nd Ts
Time Sphere with color and different Monster from Different Room:
This TS is more tricky than the other two as only certain levers/keys will unlock their respective doors. Basically, you will be exploring rooms on the left before reaching the 3rd 4-way junction. Upon reaching it, you will go right then make a detour back to the 1st 4-way junction. Following that, you will explore rooms on the right of the 1st junction before continuing on to the right of the 2nd junction. After that, you will proceed on to the left of the 3rd junction. Once done, you will go on to the 4th junction where you turn right and get yourself FULLY healed before entering as there are WarePards (leopard lookalike) inside. For the final room, you need to kill the objective in order to open the exit.
edit: Added the sequence of rooms to be explored. 1->7
d) 3rd Ts
Time Sphere with color and different Monster from Different Room:
For this Ts, make sure that you kill only the objective, so that there will be sufficient time to rest. All the rooms need to be explored, but in some of the rooms (labelled 'KO'), killing a specific target will unlock the room. As for the final room, you will fight a lv63 demon. Be prepared to use some potions. It is STRONGLY recommended that you change to a specialist (warrior/red mage/ranger) BEFORE the final room
Once done, you will get your specialist card.
For More information Please Check Out The Same Website:
http://nostale.cc-infos.com/index-8-46-1.htm
Sorry for the no experience in Level 46 Specialist because I haven reach that
Level yet =X
>Level 45 Specialist Guide (Jajamaru Quest Guide)
>Level 45 Specialist Guide (Jajamaru Quest Guide)
P.S I have No idea How To Do This Quest =X
Very Very Sorry …….Please Be Forgiving If Got Wrong Picture
Credits to Wyvern from Nostale UK Forum
Original Thread: http://board.nostale.co.uk/thread.php?threadid=5898
First things first:
Requirements to start the quest: Combat {lvl 45} minimum.
Requirements to equip Jajamaru card: Job {lvl 38} minimum, {4501} Reputation minimum.
Quest Start:
Talk to 'Yobby Expy Miner' in the 'Western Mine Plains' map, near the portal to 'Comet Meadows' in the top left of the map.
Quest Flow:
1/ Talk to 'Yobby Expy Miner'.

2/ Talk to 'Teoman Topp' in the town of Nosville.
3/ Bring 'Teoman Topp' {20} 'High Quality Tree' and {20} 'High Quality Metal Bar'.
These materials may be gotten by using a 'Production Tool for Raw Materials' bought from Teoman Topp.(uses 5 Normal Quality materials to make 1 High Quality material) They can also be gotten from certain TSes. Lastly, they can be won from 2nd Grade Mini-Games as a lvl 3 reward or simply bought from other players.
4/ Talk to 'Yobby Expy Miner'.
5/ Hunt {1} 'Meteorite Chunks'.
>>>>>>Confirm With Me is this The Meteorite Chunks??

or

The 'Meteorite Chunks' can be found near the 'Jobby Expy Miner'.
6/ Hunt {20} 'Violent Dander'.
Hunt {20} 'Violent Seedle'.
Hunt {10} 'Violent Chicken'.
All of these monsters are only found in the 'Comet Meadows' map.
7/ Talk to 'Big Tombstone'.
The 'Big Tombstone' is found after going through the portal in the center of the 'Comet Meadows' map.
8/ Complete the First Time-Space Mission.
TS Picture :
For the First Time-Space Mission you need to eliminate the 'Namaju Avatar' in every room. After Entering the Mission, go into the first room. This room will be empty, so continue on to the second room. In the second room, ignore the 'Armed Ninja Dwarf' and 'Bouncy Ninja Dwarf' and attack the 'Namaju Avatar'. After damaging it for around 25% of its HP it will disappear together with all the ninjas in that room and the door will be unlocked.
Heal up and continue on to the third room. Use the same procedure here, using Potions or Fried Chickens when necessary. After damaging the 'Namaju Avatar' for about 50% of its HP it will disappear again and take all ninjas with it.
Heal up and enter the fourth room. Do not attack the 'Drunk Ninja Dwarf' as it wont attack you either and just go for the 'Namaju Avatar' again. After damaging it for about 75% of its HP it will disappear.
Heal up again and enter the fifth and final room. In this room it is recommended to lure the 'Namaju Avatar' to the left side of the room and kill all ninjas that followed you first. If any new ninjas attack you, kill them first. After damaging the 'Namaju Avatar' for around 95% of its HP it will disappear. Now you are free to finish the TS.
Quest Flow (Continued):
9/ Talk to 'Small Tombstone'.
The 'Small Tombstone' can be found in the same room as the 'Big Tombstone'.
10/ Complete the Second Time-Space Mission.
TS Picture :
HINTS & TIPS:
A lot of people have trouble with this TS because the time limit is quite short. The best thing to do throughout this TS is to gather the Ninjas around you and use AOE attacks. For Swordmen, it is recommended to use Warrior. For Mages, it is recommended to use Fire Mage. For Archers, it is recommended to use Assassin, since Ranger takes 50% extra damage from the Ninjas(Dark -> Water).
Time is of the essence in this TS, so try to kill a lot of enemies using little time. Use the conversations that pop up after clearing a room to let your AOE skills recharge(Mission time doesnt run while a conversation is on screen, but after a while it WILL start running again, even if the conversation hasnt ended yet, so always keep an eye on that timer.).
Also, watch out for the 'Deadly Poison' status all of the different Ninjas give. Although there is no real way to avoid it, it causes you 250 damage every time you attack or use a skill. Its secondary effect(Wich is activated after half of 'Deadly Poison's duration has passed)will also cause you to only take Critical Hits, so be sure to watch your HP, as it can drop quickly.
Enter the first room and eliminate all 'Bouncy Ninja Dwarf' and 'Armed Ninja Dwarf'. Continue your killing spree throughout the second, third and fourth rooms. 'Ninja' will start appearing, they are a lot stronger than the 'Bouncy Ninja Dwarf' and 'Armed Ninja Dwarf' but shouldnt cause a lot of trouble.
In the fifth room you will meet up with 'Jajamaru'. He is an NPC that must be protected, but you dont have to watch his HP much as he takes a long time to be killed. Just continue killing the Ninjas as fast as you can and continue on to the final room. Once you enter the room you will see 'Jajamaru' and 'Princess Sakura', two NPCs that must be protected. Run past them and the Ninjas and attack the 'Namaju Avatar'. He takes a long time to kill, so try to have at least two minutes left when entering the last room. You may want to use a 'Luinia Of Restore' every so often to ensure 'Jajamaru' and 'Princess Sakura' dont die. Another idea is to lure the 'Namaju Avatar' to the two NPCs so you can protect them and fight the Avatar at the same time.
As long as you kill fast and keep an eye on your HP, you should be able to clear the second TS within the time limit.
11/ Talk to 'Mimi Mentor' in the town of Nosville.
12/ Talk to 'Calvin Coach' in the town of Nosville.
13/ Talk to 'Malcolm Mix' in the town of Nosville.
14/ Talk to 'Eva Energy' in the town of Nosville.
15/ Bring 'Eva Energy' {5} 'Fragrant Grass'.
Fragrant Grass can be Mined in the North-East corner of the 'Nosville Meadow' map. It can take a while to obtain any. If you dont have patience you could always buy them from other players.
16/ Talk to 'Malcolm Mix' in the town of Nosville.
17/ Talk to 'Calvin Coach' in the town of Nosville.

Obtain 1 'Jajamaru Card'.
Obtain 1 'Hairpin Of Princess Sakura'.
CONGRATULATIONS! You have completed the Jajamaru quest!
Other Hints and Tips:
> Use Dark Resistance Gloves/Boots, since all of the Ninjas have a Dark element attack. If you're using Fire Fairy/Sellaim you might want to use Water resist too. 'Namaju Avatar' has a Water element attack (Fire <-> Water, means 100% extra damage on both).
> If you can get them, use 'Insoluble Gloves' since they protect against Poison at a high probability.(Insoluble Gloves can be produced with a 'Production Tool for Gloves & Boots'.)
> If you have a pet that can absorb damage from the Ninjas(Strong Rammer or Big Sheep are good examples)you might want to invest in some 'Pet Guardian Doll's, since they will help your pet survive longer so you will take less damage.
> For the second TS, you should ask a Ranger to cast the 'Windwalker' buff on you. This will make you move faster so as to waste less time running from one place to the other. Any other buffs are useful too, so try to get them cast on you too. These buffs include: 'Holy Weapon', 'Blessing', 'Light Of Protection', 'Fire Blessing', 'Morale Increase', 'Detoxify Method' and 'Hawk Eye'.
> Since time is of the essence in the second TS, using an 'Amulet Of Attack Level' will help you deal more damage and using 'Fast Shoes' will make you move a little bit faster.
> The use of 'Attack Enhancement Potion', 'Armor Enhancement Potion' and 'Energy Increase Potion'(All made from the 'Consumables Recipe')could help you survive easier.
> Of course, equipping yourself with the best Armour and Weapons you can get will significantly improve your chances.
P.S I have No idea How To Do This Quest =X
Very Very Sorry …….Please Be Forgiving If Got Wrong Picture
Credits to Wyvern from Nostale UK Forum
Original Thread: http://board.nostale.co.uk/thread.php?threadid=5898
First things first:
Requirements to start the quest: Combat {lvl 45} minimum.
Requirements to equip Jajamaru card: Job {lvl 38} minimum, {4501} Reputation minimum.
Quest Start:
Talk to 'Yobby Expy Miner' in the 'Western Mine Plains' map, near the portal to 'Comet Meadows' in the top left of the map.
Quest Flow:
1/ Talk to 'Yobby Expy Miner'.
2/ Talk to 'Teoman Topp' in the town of Nosville.
3/ Bring 'Teoman Topp' {20} 'High Quality Tree' and {20} 'High Quality Metal Bar'.
These materials may be gotten by using a 'Production Tool for Raw Materials' bought from Teoman Topp.(uses 5 Normal Quality materials to make 1 High Quality material) They can also be gotten from certain TSes. Lastly, they can be won from 2nd Grade Mini-Games as a lvl 3 reward or simply bought from other players.
4/ Talk to 'Yobby Expy Miner'.
5/ Hunt {1} 'Meteorite Chunks'.
>>>>>>Confirm With Me is this The Meteorite Chunks??
or
The 'Meteorite Chunks' can be found near the 'Jobby Expy Miner'.
6/ Hunt {20} 'Violent Dander'.
Hunt {20} 'Violent Seedle'.
Hunt {10} 'Violent Chicken'.
All of these monsters are only found in the 'Comet Meadows' map.
7/ Talk to 'Big Tombstone'.
The 'Big Tombstone' is found after going through the portal in the center of the 'Comet Meadows' map.
8/ Complete the First Time-Space Mission.
TS Picture :
For the First Time-Space Mission you need to eliminate the 'Namaju Avatar' in every room. After Entering the Mission, go into the first room. This room will be empty, so continue on to the second room. In the second room, ignore the 'Armed Ninja Dwarf' and 'Bouncy Ninja Dwarf' and attack the 'Namaju Avatar'. After damaging it for around 25% of its HP it will disappear together with all the ninjas in that room and the door will be unlocked.
Heal up and continue on to the third room. Use the same procedure here, using Potions or Fried Chickens when necessary. After damaging the 'Namaju Avatar' for about 50% of its HP it will disappear again and take all ninjas with it.
Heal up and enter the fourth room. Do not attack the 'Drunk Ninja Dwarf' as it wont attack you either and just go for the 'Namaju Avatar' again. After damaging it for about 75% of its HP it will disappear.
Heal up again and enter the fifth and final room. In this room it is recommended to lure the 'Namaju Avatar' to the left side of the room and kill all ninjas that followed you first. If any new ninjas attack you, kill them first. After damaging the 'Namaju Avatar' for around 95% of its HP it will disappear. Now you are free to finish the TS.
Quest Flow (Continued):
9/ Talk to 'Small Tombstone'.
The 'Small Tombstone' can be found in the same room as the 'Big Tombstone'.
10/ Complete the Second Time-Space Mission.
TS Picture :
HINTS & TIPS:
A lot of people have trouble with this TS because the time limit is quite short. The best thing to do throughout this TS is to gather the Ninjas around you and use AOE attacks. For Swordmen, it is recommended to use Warrior. For Mages, it is recommended to use Fire Mage. For Archers, it is recommended to use Assassin, since Ranger takes 50% extra damage from the Ninjas(Dark -> Water).
Time is of the essence in this TS, so try to kill a lot of enemies using little time. Use the conversations that pop up after clearing a room to let your AOE skills recharge(Mission time doesnt run while a conversation is on screen, but after a while it WILL start running again, even if the conversation hasnt ended yet, so always keep an eye on that timer.).
Also, watch out for the 'Deadly Poison' status all of the different Ninjas give. Although there is no real way to avoid it, it causes you 250 damage every time you attack or use a skill. Its secondary effect(Wich is activated after half of 'Deadly Poison's duration has passed)will also cause you to only take Critical Hits, so be sure to watch your HP, as it can drop quickly.
Enter the first room and eliminate all 'Bouncy Ninja Dwarf' and 'Armed Ninja Dwarf'. Continue your killing spree throughout the second, third and fourth rooms. 'Ninja' will start appearing, they are a lot stronger than the 'Bouncy Ninja Dwarf' and 'Armed Ninja Dwarf' but shouldnt cause a lot of trouble.
In the fifth room you will meet up with 'Jajamaru'. He is an NPC that must be protected, but you dont have to watch his HP much as he takes a long time to be killed. Just continue killing the Ninjas as fast as you can and continue on to the final room. Once you enter the room you will see 'Jajamaru' and 'Princess Sakura', two NPCs that must be protected. Run past them and the Ninjas and attack the 'Namaju Avatar'. He takes a long time to kill, so try to have at least two minutes left when entering the last room. You may want to use a 'Luinia Of Restore' every so often to ensure 'Jajamaru' and 'Princess Sakura' dont die. Another idea is to lure the 'Namaju Avatar' to the two NPCs so you can protect them and fight the Avatar at the same time.
As long as you kill fast and keep an eye on your HP, you should be able to clear the second TS within the time limit.
11/ Talk to 'Mimi Mentor' in the town of Nosville.
12/ Talk to 'Calvin Coach' in the town of Nosville.
13/ Talk to 'Malcolm Mix' in the town of Nosville.
14/ Talk to 'Eva Energy' in the town of Nosville.
15/ Bring 'Eva Energy' {5} 'Fragrant Grass'.
Fragrant Grass can be Mined in the North-East corner of the 'Nosville Meadow' map. It can take a while to obtain any. If you dont have patience you could always buy them from other players.
16/ Talk to 'Malcolm Mix' in the town of Nosville.
17/ Talk to 'Calvin Coach' in the town of Nosville.
Obtain 1 'Jajamaru Card'.
Obtain 1 'Hairpin Of Princess Sakura'.
CONGRATULATIONS! You have completed the Jajamaru quest!
Other Hints and Tips:
> Use Dark Resistance Gloves/Boots, since all of the Ninjas have a Dark element attack. If you're using Fire Fairy/Sellaim you might want to use Water resist too. 'Namaju Avatar' has a Water element attack (Fire <-> Water, means 100% extra damage on both).
> If you can get them, use 'Insoluble Gloves' since they protect against Poison at a high probability.(Insoluble Gloves can be produced with a 'Production Tool for Gloves & Boots'.)
> If you have a pet that can absorb damage from the Ninjas(Strong Rammer or Big Sheep are good examples)you might want to invest in some 'Pet Guardian Doll's, since they will help your pet survive longer so you will take less damage.
> For the second TS, you should ask a Ranger to cast the 'Windwalker' buff on you. This will make you move faster so as to waste less time running from one place to the other. Any other buffs are useful too, so try to get them cast on you too. These buffs include: 'Holy Weapon', 'Blessing', 'Light Of Protection', 'Fire Blessing', 'Morale Increase', 'Detoxify Method' and 'Hawk Eye'.
> Since time is of the essence in the second TS, using an 'Amulet Of Attack Level' will help you deal more damage and using 'Fast Shoes' will make you move a little bit faster.
> The use of 'Attack Enhancement Potion', 'Armor Enhancement Potion' and 'Energy Increase Potion'(All made from the 'Consumables Recipe')could help you survive easier.
> Of course, equipping yourself with the best Armour and Weapons you can get will significantly improve your chances.
Thursday, March 20, 2008
>Lvl 55 Specialist Guide
>Lvl 55 Specialist Guide
Credits to LoneAngelz / Moja from Nostale UK Forum
Original Thread: http://board.nostale.co.uk/thread.php?threadid=3110
To aquire mission;
Combat level: 55 and above
To equip the card;
Job level: 50 and above
Reputation: 7000 and above
Location of soul gem: Mt. Kerm Peak :

Difficulty: HARD, may take 14 hours to finish mission, best way is to find a party of 3.
Other notes:
• Timing to finish mission may depend on luck.
• Prepare 1 million gold for the mission as it will reqired in the mission.
• You may aquire quest items during the mission, so do not delete them.
• When the mission calls for killing of monsters, try TS 65, 62, 51 if there isnt enough mobs to kill.
• For the first ts for this mission, there is a leaver on the right. try not to pull it as it spwans large mobs. You can pass the mission without pulling that leaver.
• Recommend level 60+ to complete mission as it might be difficult.
Step-by-step guide to get your card!
Part A:
1. Go to West Mt. Krem -> Peak and talk to Soul Gem.
2. Talk to Soraya Style
3. Go to either Mountain Cave 1 or 3 and hunt Weak Skull (lvl 57). Collect 50 "Blood Ice stone".
4. Talk to Soraya Style and return to talk to Soul Gem. Talk to Calvin Coach
5. Hunt Old Dustdeath (lvl 57) in Mountain Cave 2 and retrive "Fragments of the diary"
6. Talk the second NPC and get diary. Return to soul gem to obtain "Instant TimeSpace Stone".
7. Enter first time space with "Instant TimeSpace Stone"
TS Picture:
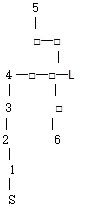
S: Start
L: Leaver (this leaver is the optional leaver which u do not have to pull)
parts 1,2,3: clear mobs
part 4: kill "skid Frozen Heart"
part 5: kill Hell guard (no element)
part 6: kill Kartoss (water element)
Part B:
8.Talk the the Soul Gem after you clear the first TS.
9.Talk to Eva energy
• Collect 40 "Bean Hull" from Quick Thorn Pii (lvl 61), in East Mt. Krem. Receive "Bean Hull".
• Collect 40 "Flint" from Red-Hot Golem (lvl 61), Shanera Dungeon B1. Receive quest item "Flint" .
• Collect 40 "Straw" from Wiggler (lvl 61), in Mountain Cave 5. Receive "Straw" .
• Collect 50 "Special Water Bottle" from Rocky Mountain Turtle (lvl 61), in East Mt. Krem. Receive "Special Water Bottle".
• Collect 1 "Special Bleach Recipe" from Foggy Collosus (lvl 64), in Foggy Valley. Receive a "Special Bleach Recipe".
Use the Special Bleach recipe to create Special Bleach.
Talk to Eva Energy again and receive "Ruddy's handkerchief" .
Talk to Anni at west mt krem and buy a book "The elementary book of adventure" from her. (Cost 1 million Gold)
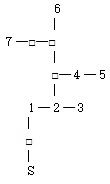
10. Talk to Soul Gem and receive "Instant TimeSpace Stone" .
Ts Picture:

S: Start
1,2,3,4: clear mobs
5: kill "satan"(fire element) + 2mins 30 seconds
6: Kill hell guard (no element)
7: kill Kartoss (water element) + protect NPC
Part C:
11.
• Talk to Soul Gem again and found out that "Necklace of the lucky stone" is required.
• Talk to Knight Pinto and realized "Holy Water Bottle" is needed. Bring along one empty bottle.
• Go to basement of a cave and find the well containing Holy Water. (The well can be found next to TS 57, after vertical cave.)
• Return with the bottled holy water and bring to guard captain. Receive "Necklace of the lucky stone"
• Talk to Soul Gem again and realized "Justine's portrait" is required.
• Talk to Guard Commander Ray
• Hunt Darksy Dame Savina Catsy and receive "Triangle Key" (Target can be Found in Shanera Dungeon B3)
• Hunt a Iron torturer (lvl 6 and receive "Small treasure chest". (Target found in the portal in the top left hand corner of Shanera Dungeon B3, Labyrinth of Pain)
• Talk to fourth NPC again and receive "Justine's portrait".
• Talk to Soul Gem and receive "Instant TimeSpace Stone".
TS Picture:
S: Start
1,2,3: clear mobs
4: kill Seina Reiya (light element, Crusader) + 2mins 30 seconds
5: kill Hell Guard (no element)
6: kill Fell Guard (no element) + protect NPC
7: kill Pelicert (water element) + protect NPC
Part D:
Receive another "Instant TimeSpace Stone*".
TS Picture :
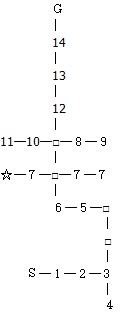
S: Start
1: recieve NPC (NPC must be protected during the whole ts)
2,3: Clear mobs
4: Open a leaver
5,6: Clear mobs
7: kill Fell guard (no element), enter the rooms in any order
"star shape object": Time bonus: kill all monster within 1 minute to obtain 3 minutes as reward
8: kill Fell guard (no element)
9: kill Kartos (water element)
10: kill Fell guard (no element)
11: kill Kartos (water element)
12: kill Fell guard (no element)
13: kill Kartos (water element)
14: kill Archtheridon Hellduke (dark element)
G: ENDING!!!
Screenshot of the boss:

Part E:
Talk to the Soul Gem to obtain your new SP card.
___________________________________________________________________
Legend:
* Quest item
(-) extra notes
(some monsters and map names are very hard to translate, so only the TS section is added only)
(" X ", symbols removed when names are confirmed)-LoneAngelz
(Other sections of the quest has been added, but some names are still unknown)-Moja
From: Gamebase, etc sources
Also in the process of updating...
Credits: Moja, LoneAngelz
Credits to LoneAngelz / Moja from Nostale UK Forum
Original Thread: http://board.nostale.co.uk/thread.php?threadid=3110
To aquire mission;
Combat level: 55 and above
To equip the card;
Job level: 50 and above
Reputation: 7000 and above
Location of soul gem: Mt. Kerm Peak :
Difficulty: HARD, may take 14 hours to finish mission, best way is to find a party of 3.
Other notes:
• Timing to finish mission may depend on luck.
• Prepare 1 million gold for the mission as it will reqired in the mission.
• You may aquire quest items during the mission, so do not delete them.
• When the mission calls for killing of monsters, try TS 65, 62, 51 if there isnt enough mobs to kill.
• For the first ts for this mission, there is a leaver on the right. try not to pull it as it spwans large mobs. You can pass the mission without pulling that leaver.
• Recommend level 60+ to complete mission as it might be difficult.
Step-by-step guide to get your card!
Part A:
1. Go to West Mt. Krem -> Peak and talk to Soul Gem.
2. Talk to Soraya Style
3. Go to either Mountain Cave 1 or 3 and hunt Weak Skull (lvl 57). Collect 50 "Blood Ice stone".
4. Talk to Soraya Style and return to talk to Soul Gem. Talk to Calvin Coach
5. Hunt Old Dustdeath (lvl 57) in Mountain Cave 2 and retrive "Fragments of the diary"
6. Talk the second NPC and get diary. Return to soul gem to obtain "Instant TimeSpace Stone".
7. Enter first time space with "Instant TimeSpace Stone"
TS Picture:
S: Start
L: Leaver (this leaver is the optional leaver which u do not have to pull)
parts 1,2,3: clear mobs
part 4: kill "skid Frozen Heart"
part 5: kill Hell guard (no element)
part 6: kill Kartoss (water element)
Part B:
8.Talk the the Soul Gem after you clear the first TS.
9.Talk to Eva energy
• Collect 40 "Bean Hull" from Quick Thorn Pii (lvl 61), in East Mt. Krem. Receive "Bean Hull".
• Collect 40 "Flint" from Red-Hot Golem (lvl 61), Shanera Dungeon B1. Receive quest item "Flint" .
• Collect 40 "Straw" from Wiggler (lvl 61), in Mountain Cave 5. Receive "Straw" .
• Collect 50 "Special Water Bottle" from Rocky Mountain Turtle (lvl 61), in East Mt. Krem. Receive "Special Water Bottle".
• Collect 1 "Special Bleach Recipe" from Foggy Collosus (lvl 64), in Foggy Valley. Receive a "Special Bleach Recipe".
Use the Special Bleach recipe to create Special Bleach.
Talk to Eva Energy again and receive "Ruddy's handkerchief" .
Talk to Anni at west mt krem and buy a book "The elementary book of adventure" from her. (Cost 1 million Gold)
10. Talk to Soul Gem and receive "Instant TimeSpace Stone" .
Ts Picture:
S: Start
1,2,3,4: clear mobs
5: kill "satan"(fire element) + 2mins 30 seconds
6: Kill hell guard (no element)
7: kill Kartoss (water element) + protect NPC
Part C:
11.
• Talk to Soul Gem again and found out that "Necklace of the lucky stone" is required.
• Talk to Knight Pinto and realized "Holy Water Bottle" is needed. Bring along one empty bottle.
• Go to basement of a cave and find the well containing Holy Water. (The well can be found next to TS 57, after vertical cave.)
• Return with the bottled holy water and bring to guard captain. Receive "Necklace of the lucky stone"
• Talk to Soul Gem again and realized "Justine's portrait" is required.
• Talk to Guard Commander Ray
• Hunt Darksy Dame Savina Catsy and receive "Triangle Key" (Target can be Found in Shanera Dungeon B3)
• Hunt a Iron torturer (lvl 6 and receive "Small treasure chest". (Target found in the portal in the top left hand corner of Shanera Dungeon B3, Labyrinth of Pain)
• Talk to fourth NPC again and receive "Justine's portrait".
• Talk to Soul Gem and receive "Instant TimeSpace Stone".
TS Picture:
S: Start
1,2,3: clear mobs
4: kill Seina Reiya (light element, Crusader) + 2mins 30 seconds
5: kill Hell Guard (no element)
6: kill Fell Guard (no element) + protect NPC
7: kill Pelicert (water element) + protect NPC
Part D:
Receive another "Instant TimeSpace Stone*".
TS Picture :
S: Start
1: recieve NPC (NPC must be protected during the whole ts)
2,3: Clear mobs
4: Open a leaver
5,6: Clear mobs
7: kill Fell guard (no element), enter the rooms in any order
"star shape object": Time bonus: kill all monster within 1 minute to obtain 3 minutes as reward
8: kill Fell guard (no element)
9: kill Kartos (water element)
10: kill Fell guard (no element)
11: kill Kartos (water element)
12: kill Fell guard (no element)
13: kill Kartos (water element)
14: kill Archtheridon Hellduke (dark element)
G: ENDING!!!
Screenshot of the boss:
Part E:
Talk to the Soul Gem to obtain your new SP card.
___________________________________________________________________
Legend:
* Quest item
(-
(some monsters and map names are very hard to translate, so only the TS section is added only)
(" X ", symbols removed when names are confirmed)-LoneAngelz
(Other sections of the quest has been added, but some names are still unknown)-Moja
From: Gamebase, etc sources
Also in the process of updating...
Credits: Moja, LoneAngelz
Subscribe to:
Posts (Atom)